In a badminton doubles rally you will either be attacking or defending, and it’s important to understand which tactical situation you’re in, where you and your partner should be standing, and the effect your shot will have on the situation. In other words, it is important to understand basic badminton tactics! So if you are uncertain about these tactical aspects, read on.
Note that, although tactics are different in mixed doubles, the basic principles are the same – I will discuss the differences in another article.
Positioning Yourself for Attack and Defence in Badminton Doubles
You may already be familiar with the standard attack and defensive formation in badminton doubles. But to understand badminton tactics it’s also important to know why you stand in this way – especially in fast rallies where the situation is not so clear cut and you need to improvise. So let me talk about what the attack and defensive formations are, and why you stand in those positions.
The Smash
The key to understanding attacking and defensive badminton tactics is the smash. A smash is a powerful shot which is hit steeply downwards, with the objective of getting a weak return or finishing the rally.
The standard badminton doubles tactic is to gain control of the rally by forcing your opponents to lift, and then playing increasingly aggressive shots until you can finish the rally with a smash. So attack and defence in badminton doubles is determined by which side has lifted the shuttlecock so the other side has the opportunity to smash.
(To learn more about smashing see the proper technique for a smash)
Badminton Doubles Defensive formation
Let’s say your partner lifts the shuttlecock up high enough for an opponent pair to smash it into the mid-court. This opponent can smash, drop shot or clear the shuttlecock; but as the smash is the hardest shot to return, it is the smash that you should prepare yourself for.
So you and your partner should stand side by side in the mid-court so that between you, you cover the full court width. These are the proper badminton tactics to ensure that one of you is within reach wherever the shuttlecock is smashed.

Defensive Formation in Badminton
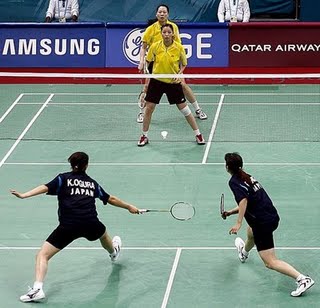
Your positioning in this instance is the badminton doubles defensive formation, and maximises your chance of returning the smash. The players at the bottom of the photo below are in the typical defence formation.
As you’re both in the mid-court, if your opponent plays a drop shot, you should be close enough to the net to return it. If he clears, you should have time to move back and hit it.
Badminton Doubles Attacking formation
So let’s say your opponent clears the shuttlecock to your partner’s side, and he’s quick enough to get in position to smash it. Your opponents will also move to maximise their chance of returning his smash – they’ll stand side to side in the mid-court, ready.
So where should you be standing? In this situation you assume your partner will smash, so that’s what you should prepare for.
Assuming your partner smashes well, then your opponents should only be able to either lift or play a net shot. If they lift it your partner can hit it again, so your main task is to cover any replies to the net, and you should stand so you’re in easy reach of these. This is the badminton doubles attack formation – one of you covering lifts to the back, the other net shots at the front.
The players on the left in this photo are in the attacking formation:
However, if your partner’s smash is weak, or your opponents are very sharp, then the best badminton tactics for them are to drive the shuttlecock in a flat arc to the back (typically cross court away from your partner), or push the shuttlecock past you to the mid court, so your partner has to stretch forward to return it.
So an additional role for you is to anticipate other shots, particularly cross-court drives, so you can intercept them and maintain the attack. Standing just behind the T is usually the best place – close enough to the net to cover it, but far enough back that it’s difficult to push the shuttlecock past you, and you have a chance of intercepting those cross court drives.
Standing behind the T gives you the additional benefit of seeing the shuttlecock sooner after your partner hits it, so you have more chance to react to his shot. An important piece of badminton tactics advice is: if you’re at the front you should never look back at your partner when he’s about to hit the shuttle – you risk being hit in the eye and also won’t be watching your opponents to see how they react to the shot. Watch your opponents as your partner takes the shot, and if you watch where they’re looking you’ll get a clue to where the shuttlecock is going too.
If you get possession of the shuttlecock while you’re at the front, your partner should assume you’ll play a net shot, a drive, or a kill (smash) in front of you, and that the opposition will lift to the back tramlines, either directly in front of them or to the centre. He should therefore stand within easy reach of both these shots – but not so far back that he can’t reach any push shots that get past you.
The diagram below shows this situation after you’ve hit the shuttlecock down to player 2’s feet:
The shuttlecock is by Player 2’s feet, so he has to hit the shuttlecock up. So player 1 assumes that player 2 will lift it, and moves to cover the two places that 2 is most likely to lift to – the middle of the rear-court and down the line to the rear-court.
Changing formation during a rally
In a badminton doubles rally both sides will often switch between attacking and defending many times. To see how this works in practice, watch this video, featuring a rally from the Men’s Doubles final at the 2004 Olympics. Watch the changes in formation that occur as the opportunity to smash passes from one side to another. It’s fast-paced so it’s concentrating on a single pair to get a better feel of how fluidly the formation changes should be.
Badminton Tactics Summary
- Positioning in badminton doubles is determined by who has the opportunity to smash.
- If the shuttlecock is lifted high in your side so one of you can smash, then you should be in the attacking formation. One player will cover the front of the court, the other the back of the court.
- If the shuttlecock is lifted high into your opponents’ side so they can smash, then you should be in the defensive formation. You will cover the mid-court, one side each.
This is the simplest way to look at the badminton tactics involved in positioning. However, you will want to vary your approach based on your own skills and ability, your partner, your opponents, and the way the rally is working out. I hope to write more about this in another article.
For more badminton tactics, see this badminton doubles shot selection article. Also check out the badminton tactics category on this site to see all badminton tactics articles.
[sc name=”subscribe form” title=”tactics end” /]


Pingback: Badminton Doubles.com: Play Better Badminton | Badminton Doubles
Pingback: 2009 Yonex Japan Open – Badminton Doubles Finals | Badminton Doubles
what is returning the shot tactic
Thanks, information is really helpful.
Pingback: Les double en badminton: vidéo de formation / Badminton doubles: training videos |
Pingback: Badminton Doubles Strategy | Birg
Pingback: Badminton Doubles Strategy | Birg
very useful information. i’m a singles player and do not know much about playing doubles. there was so much i did not know. thank you!
trm.kaseh banyak kpd penulis,semoga ilmu kita semua makin bertambah.anda patut di contohi/.
Just been sent a translation of this:
“Thank you to the writer, may all our knowledge be gained. You should be en example to follow.”
Thanks for the compliment, Zali!
helped me out allot thanks xxxxxx
Great information for us because we don’t have coach, thank you very much
Pingback: Badminton Defensive Tactics | Badminton Tactics
Pingback: Improve Your Badminton Doubles: Basic Tactics – Overarm Shot Selection « Badminton Doubles